Wednesday, October 31, 2012

Happy Halloween!!!

Happy Halloween!!


I am so excited it is Halloween! I  don't trick or treat, and we don't get trick-or-treaters but I still love to decorate my house! I hope everyone has a safe and happy Halloween! Please remember to take your animals inside and watch out for strays!

The other day I was searching pinterest and I came across this neat article on uses of Baking Soda. I am allllll for all natural stuff, I already use baking soda and vinegar for most of the cleaning in my house, I thought to take a look and see any more ideas! In the article there was a direction to whiten your nails with some. I looked at my nails, I didn't think they looked bad, but I thought why not give it a try?

Here is a before picture ( please mind my icky pointer finger, I sliced the corner off with the slicer at work ):

 Here is the process - 3 equal parts baking soda to 1 part water.


Here is my nails after:


My nails weren't bad, but I can definitely see a difference. 

I wanted to do one last Halloween mani, but I decided to do just a spooky dark color since today is Halloweeeeen, and I just painted my nails again yesterday. I was curious if Wet n Wild would be doing a Halloween collection or anything this year, usually around here I can find the gravestone styles ones- those are the ones I was thinking of but I had thought they made new colors every year. I don't think they do because I've only seen the same ones I saw last year.. Hubby found the Pick Your Poison Collection at Walgreens and he bought me a few, and today I am wearing Poison Ivy. I added some glitter on it before I remembered to take a picture of the color on my nails and so I asked Hubby if I could paint one of his nails to show you and he was like "no way" *puppy dog face* "ok.." 10 minutes go by.. "Fine, just one nail, and I'm taking it off as soon as you take the picture." He is just too cool :D.


 So here is his nail with just the color on it. I love this color, it is so deep and just so rich. I added OPI - Fresh Frog of Bel - Air Glitter and I thought it really added a beautiful touch!


Thank you for reading! I hope you enjoyed. Happy Halloween! Be safe, enjoy your candy!

**Also, we have set up a Facebook page! Please come like us, we would like to do a giveaway!!!!  Click here to like us!**

xxooo
Pan


Monday, October 29, 2012

Another Halloween inspired post


Alright, well Halloween is coming quickly! I wanted to do another Halloween inspired nail post before Halloween actually gets here, but last night I got the WORST headache ever. So I started doing individual designs on my nails and then just gave up. I still like how they turned out, they're just sloppy, but I hope everyone enjoys them anyways!

Started off by putting on 2 coats of Wet n Wild: Fast Dry in Orange (Orange is all they could come up with for a name? lol). I am not really into orange polish, but I needed some for Halloween, so I bought it. I ended up LOVING it!! It has just the right amount of sparkle in it and its the perfect shade!


Then I was starting to do a different design on each nail, but like I said, the headache pretty much took over and I wasn't feeling like doing anything. So instead of starting over on the two nails I started, I just did something else on the rest and kept the two random nails. lol


 Since my headache was so bad, I didn't do the spiderweb and pumpkin nail on the other hand, I just stuck with the green, black, and orange on the other hand.


Here are the other two colors used. Wet n Wild: Fast Dry in Ebony Hates Chris. The green is Sinful Colors in Innocent. All the green and black was free hand. I really need to get some good tape and patience. I tried to do some stripes on my nails before with scotch tape and it turned out terrible. lol I didn't let the base color dry long enough and the scotch tape peeled off half the paint. Some things are fairly easy to do free hand, you just need the right brushes! I almost forgot to mention, I finished off with a clear coat of Super Dry by Diamond Cosmetics.  Forgot to take a pic, so I just googled it.


Sorry that this post was so short, but I hope that you enjoyed it! Please feel free to share your Halloween designs with us!

                                                                              Happy Halloween!!
                                                                                               xo Leah

Friday, October 26, 2012

I'm a Pumpkin Queen!

Hi there :)

Halloween is right around the corner. Literally like right there. Can you believe it? Where has this year gone? It has really flown by! I really love Halloween though! It's my favorite holiday! I love to put up spooky decorations. We  never get trick or treaters here, but we buy candy just in case! I have been doing mostly Halloween inspired mani's this month and I have been having a blast. I hope to do one more before Halloween gets here.

This week my nails look like pumpkins. I did something a little different and I only painted my thumb nail with a pumpkin face since my thumb is my biggest nail I thought it would be easier and less time consuming. I tried that magnetic nail polish stuff the rest of my fingers. Holy cow, that stuff is neat!! I would like to try more colors and other brands of this stuff! I had a hard time the first time I tried it, because I kept smashing the lid down onto my nail into the polish, so I ended up having to take all my polish off and redo it! I saw a picture the other day of sinful colors with a ring, that is a great idea!

First I painted all of my nails orange. (After adding the magnetic polish though, I realized that I didn't need to paint my nails under the magnetic.) I don't have a lot of oranges so I used Wet n Wild- Fast Dry brand 9021 Orange.


I painted a pumpkin face on my thumb nail once everything was all dry. I used Wet n Wild Black Creme. I used a mini paint brush that I found at Joann's. I forgot to take a picture of it so i linked you right to it.


Last I added the magnetic polish. This stuff is fun and really neat to use. See, no need for the orange on all the fingers. I would save yourself the time!


Here's my finished hand.


Thank you for reading I hope you enjoyed!

xxooo
Pan

Here's a picture of my Sweet Boy

Thursday, October 25, 2012

Make your own glitter polish!


I would like to say that I am one of those girls. I am like a mosquito to one of those zapper lights when it comes to glitter! When it comes to nail polish, I will choose glitter over any other colors generally. Lately I keep seeing some REALLY awesome holographic nail polishes and I don't have any of the good ones. Honestly, I don't even think I have any! OH NOOOOO!!! Seriously though, I need some like asap. So while shopping a few weeks ago, I was looking thru some Halloween stuff at Meijer and I happened to notice they had some REALLY pretty holographic glitter! It wasn't nail polish, just intended for makeup or something I assume. So I had remembered Panacea telling me about how she had made her own nail polish with eye shadow and a clear coat polish, so I figured why couldn't I make my own holographic glitter nail polish?! Of course I bought the glitter, then I went and bought a bottle of Wet n Wild: Wild Shine Clear Nail Protector. Oh and the glitter says from the makers of Wet n Wild. Its Fantasy Makers Confetti.


First thing I did was pour a little bit of the clear top coat out. I poured it into another bottle of top coat, I don't like to waste. 

Then I just started adding the glitter to the bottle till I thought it was enough. Here is the first round of testing. This is after 1 coat.


It was nice, but not exactly what I was looking for. So I tried another coat.


Still nice, but again, not what I was looking for. I wanted something that went on thick. So I decided to add more glitter to the clear polish. 


So this was after adding more glitter. This is 1 coat. Starting to look good. Decided to do another coat.


Not bad, not bad. Decided to try one last coat.


Camera got a little wonky, but you get the idea. You can see how thick it is. So I think this is pretty good. I still have about 2/3 of the bottle of glitter left, so I could add more if I wanted, but I think I am going to wait to do that, test it out more.

After doing this I was thinking to myself... "Oh God, now I have to remove the glitter!"


This is a true statement. lol But to my surprise, with my acetone nail polish remover it almost all came off in one swipe! I couldn't believe it! So not only does it look awesome, its super SUPER easy to do, but it also comes off amazingly. So try it yourselves ladies! Experiment, see what you can come up with, and please feel free to share with us any creations!!  We would love to see them!


This is the kind I used. Works great for me for just about all my polishes.


Here is a pic of the glitter nail after 1 swipe of a cotton ball and acetone! Can you believe it? Because I can't!   Anyways, thanks for taking the time to read this!

xoxo Leah


Wednesday, October 24, 2012

Frankenstein inspired nails

Hey guys! I'm Leah. Panacea's best friend. She was so kind as to ask me to join her in doing this nail blog, knowing how much I LOVE nail polish I'm sure. lol Anyways, like I said, names Leah. I am a wife and mother of two little boys. Ezekiel (Zeke) is 3 and Elijah will be 1 on December 1st. So they keep me pretty busy, and I don't really get much time for myself. Some nights, no time at all. So when I do get some free time, one thing I enjoy most is painting my nails, trying different techniques and designs out. You could probably say that I have a bit of an obsession with nail polish. I don't have millions of polishes, but boy do I wish I did. I probably only really have about 60, but someday hope to have LOTS more! lol

As Panacea mentioned earlier, we are all about cruelty free polishes, however from time to time you may see us using one or two from our collections, but ONLY because we had them before realizing they were NOT cruelty free. Sally Hansen, which is one of the brands I am actually using in this tutorial claims on their website that they do not test on animals, however they are NOT on PETA's list. As for the rest of my colors in this tutorial, to the best of my knowledge are all cruelty free.

Seeing as Halloween is coming up, I of course wanted to do something for the occasion. My son Zeke is going as Frankenstein this year, so I thought why not do that. I am sure since today is only the 25th, I may be doing one more Halloween inspired nail, but we'll see. Cool side note... Did anyone else know that Frankenstein is not the name of the actual monster? Frankenstein is the name of his creator, but everyone just kind of turned it into being referred to as Frankenstein.The creator is Victor Frankenstein and if you click that link, you can read for yourself about the rest. For now here is what I did.


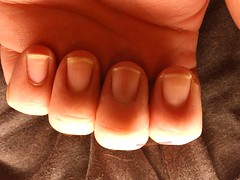
First I started off by cleaning up my cuticles a lil. I admit, I am a picker and I pick at the sides of my nails. Never been a nail biter, but picking at them is just as bad, if not worse. I am trying to break that habit however and they're looking pretty good compared to normal.

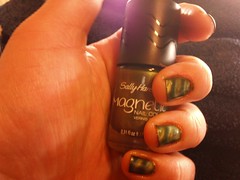
Second thing I did was put some Sally Hansen: Hard as Nails Hardener on them. I have thin, weak nails that like to chip, so a friend gave me a bottle for free and since I actually starting to give a crap about my nails, I thought I would try it out. Personally, I think it works pretty good! Been using it for about a month, but not very frequently and I like the results so far. I like to use it as a base.


Recently I read somewhere... I wish I could remember where... that if you put some sort of greasy lotion on your fingers around the edge of your nails, it will help to remove screw ups. So if you suck at painting your own nails like me, this is great for you! Make sure not to get it on your actual nail, because then it's hard to paint over it. I like to use Aquaphor by Eucerin. I had some already for my kids, so why not use what you already have! Vaseline works great too. So not only does it help you keep nail polish off your skin, it will keep your fingers moisturized!


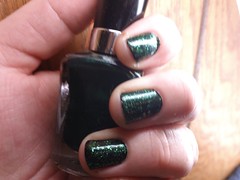
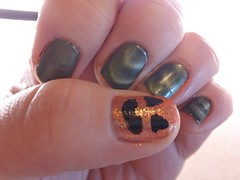
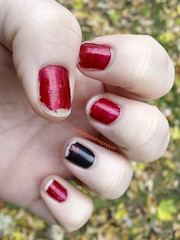
For the green for Frankenstein, I used Innocent by Sinful Colors. I had to do about two coats of this. I really love Sinful Colors and am so glad to hear that recently they have stepped up and admitted to doing wrong by some other nail bloggers. They have some great colors, but this one for me seems to be a lil weird. Its almost like its trying to be matte, has that weird texture, but is still semi glossy. I could just have a defective bottle too, who knows. Anyways, put two coats of that on and let it fully dry.


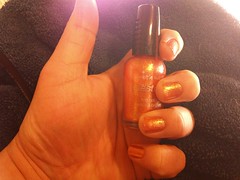
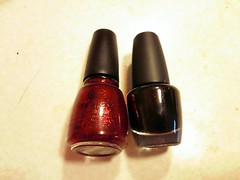
For Franks hair, I used Ebony Hates Chris by Wet n Wild in the Fast Dry line. If you are looking for a cheap black polish with gloss that goes on GREAT then this is your color. I absolutely LOVE this black. I have been using it a lot lately too. To apply it, you don't want to use the brush in the bottle because it creates too thick of points. Unless you're like super talented, then I guess you could try it, but I did and failed horribly. lol So I went and bought myself a set of painting brushes. They were $4.99 at Meijer in the craft section. I bought a variety, so that I could use them for other designs. What I did was just dab some of the Ebony Hates Chris onto a paper plate and then dipped the brush in with only a little on the brush. You don't want too much on there, because then it will just be a mess. You can always go over it later if extra coats are needed. The rest is pretty much self explanatory from the pictures. I didn't do any fancy tricks to make the jagged edges, just free handed it. Which btw is a lil difficult for me because I am shaky. I think they turned out pretty good though!


After finishing all the black hair, I applied a top coat of clear "Super Dry" which I have no idea where my mother bought it from. (My mom bought me some because I kept stealing hers!) Its fantastic however! On the bottle it has a website, for anyone interested...It is Diamond Cosmetics.


I hope you guys enjoyed my post. I am quite surprised with myself on a few things. 1. I didn't screw up my nails. I even had to stop mid painting, because Elijah woke up and wanted a bottle. So I fed him, and changed him, and played for a lil bit, and they're still completely intact, which for me is a pretty big deal. GO ME! 2. I was having second thoughts about doing this blog ONLY because I kinda suck at words and coming up with things to say, but look at how long this is! I think I did good. Hopefully I kept it interesting enough and nobody left because they were bored. So yea, I hope that you guys will come back every week to see what new ideas Panacea and I have to come up with and what colors we have to share with you!

                                                                                          Peace out!
                                                                                                       -Leah


Monday, October 22, 2012

My first blog post

Hi there :)

My name is Pan. I am starting this blog to show you my nails! I love to paint my nails! To me its almost like a therapy session. I sit and paint my nails and that is my 'me' time! I have another blog that I was sharing some nail things on and also other things but my Hubby recommended that I have one blog specifically for my nails and one for my rantings and my other things I do. If you are interested in checking it click here! My hubby helped me with the name for this blog and I really love it!! I would like to make a blogroll of nail blogs so if you would like to have your blog posted in my blogroll- please post in the comments a link to it and I will add it, please add me to yours also ! That would be super neat!

So, let me tell you about my nails!

I painted my nails like last week and usually with my new job, and the gloves I have to wear the polish chips off super fast, like two or three days. These polishes have chipped some but they really aren't bad! I did work a day less, that could have an effect but I don't know.. I used China Glaze: Ruby Pumps and L.A. Colors Black Velvet. I really love both of these brands because they are cruelty free, which is super important to me and they both have super awesome formula. This L.A. Colors one, I bought at my local Dollar Tree! They have TONS of colors and they are pretty colors I think!

Left: China Glaze: Ruby Pumps / Right: L.A. Colors Black Velvet
 

Here is a view of my nails after I painted them. I absolutely love this red. I think it is so sexy and elegant. I love the red glitter ( I could no get a good photo of that :( ) it's noticeable when you look at it but it is not like bling bling. I really wish that I could have gotten a better picture of it. The black nail also has a tip of the red glitter. 


 Here is a photo I took outside. You can really see the beauty of the polish and how it looks now, a week after I painted them. 

Thanks for reading!!

xxooo
Pan